Tuesday, January 21, 2014

Let it Snow - Projects Using Files from Juliana Michaels

Over the Christmas holidays I had some time off and was given the opportunity to play with some Silhouette files designed by the very talented Juliana Michaels.  It had been a while since I had actually sat down and created something for myself, so I was very excited to play.

This is the set of files that I played with!  It is called Let it Snow, which was perfect because we were right in the middle of a big snow storm so it really inspired me :)


I dug into my photos and found some old ones that I really wanted to scrapbook!  I also had some brand new papers from the Bo Bunny Woodland Winter collection.

The first project I made was a photo tray.  I have picked up a few of these trays over the years with the intension of making them, but never really got around to it.


I used one photo and cut it in half to put it in 2 different sections.  I love how this turned out.  I used the 'Let it Snow' die-cut and sized it down to fit on top of my photos.


I used the 'Baby it's Cold Outside' file for the main title on my tray.  It really wasn't that cold outside....as you can see, Jason is not even wearing a coat.  It was March and the sun was shining.


The snowman file is my favourite.  He is so simple but just perfect to add some stitching and a few embellishments to to jazz him up.  I also used one of the snowflakes and using the welding function on my Silhouette, I created a border for the center of my tray!!


My next project is a single layout using some more of the photos that I found in my stash!!  Like I said before, it had been a while since I have really scrapbooked so I wondered if I even rememberd how.  Working with these files made it really easy to put this page together!!!


I just loved the 'Let it Snow' title and I wanted it to really stand out on my page.  I created a couple of mats to layer behind the title and then added a chipboard snowflake for an accent!


The tags are lots of fun to work with too.  I layered this one with brown and set an eyelet and added some twine.  I found some sequins that matched and added a little sparkle.


I also had some snowflake embellishments from Jolie's that worked really well with my papers and the files, so I added one of them to my layout as well.


I did my journaling using my sketch pens and my Silhouette!  There is just no other way to do it.  There are so many great fonts and you can place it wherever you want.


For my final project I created this sweet snowman card.  


I embossed the background with a snowflake embossing folder.  I added sequins for the snowman's buttons and a carrot button for his nose.
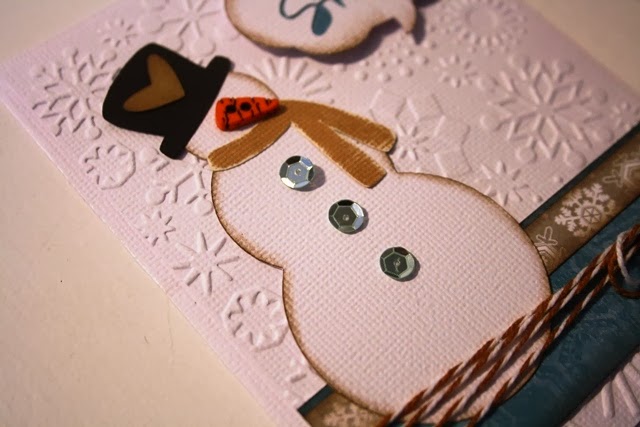

I inserted the 'Let it Snow' phrase into a speech bubble and then backed it with some matching blue paper.


Thank you so much for stopping by and visiting my blog.  I had a wonderful time working with these files and I hope I have inspired you.  

Be sure to visit Juliana's blog and you can download these files for yourself.  

Friday, January 3, 2014

A Little Sneak Peek!!

I am so excited to share a little sneak peek for a project that I am working on! I can't really give any details, but the rest will be coming soon.


I can tell you that I have been playing with  my Silhouette and working with some really great files from Juliana Michaels!


Friday, December 27, 2013

Santa Pants - Gift Bag

Merry Christmas everyone! I truly hope that each and every one of you had a wonderful Christmas filled with joy and happieness!

I did have a little bit of time to do some Christmas crafting.  One of the things that I made was this awesome pair of Santa Pants for a gift that Joanne and I gave to Shelby!!!  Aren't they the sweetest????  I used a FREE svg file from SVG Cuts and my Silhouette (of course).


I used glitter paper from Best Creations for the pants.  This glitter paper is the BEST!  The glitter does not fall off the paper and make a huge mess, plus it cuts beautifully in the Silhouette.  I filled the pants with some crinkled kraft paper (I purchased this at my local dollar store), along with some other treats too.


For the cuffs of the Santa Pants, I used my Cuttlebug and embossed snowflakes on to the white paper.  It added a little texture and a magical feel.


I had a great time putting these together to give as a gift.  I will definitely be using this file again for next year. 

Thursday, December 19, 2013

Merry & Bright Spinner Card

Good Morning!!!  I am super excited to share a card that I made for Christmas.  I have a few people on my list that I will be giving cards to, and I wanted something special.

I decided that I would try and make a 'spinner' card.  It is an interactive card where my penguin 'tumbles' across the front of my card.....through the snow.  Fun, huh?


I made a quick little video so that you can see it in action (I am no professional at this.....and I was holding the card in one hand and trying to record with my other hand.....so please be kind)!


Isn't that adorable?  I am so pleased with how it turned out.  I used my Silhouette to cut out the penguin. There are so many possibilities that I think I am going to make some more using different icons.  

We are going to be running this as a Make 'n Take at Two Scrapbook Friends this Friday, December 20th and Saturday, December 21st.  Check out the store blog later today for all the details.


Friday, December 6, 2013

Songs Of Christmas Blog Hop With Two Scrapbook Friends!!

Welcome to the Songs of Christmas Blog Hop with Two Scrapbook Friends! You should have arrived here from Ann's blog.


Our Blog Hop is all about the Songs of Christmas and the inspiration for my project comes from the song Walking in a Winter Wonderland.  Everytime I hear this song I picture walking in a park (let's say Waterloo Park) with the snow falling gently.  The snow always shows up best when you look up at a light post.....and that is what inspired my project!!!

I found this great SVG file at SVG Attic that was exactly the type of lamp post I was thinking of.  The file was designed so that the finished project would be aproximately 6-inches tall so I modified it and my finished post is about 18-inches tall.


In the spirit of Christmas, I added a silver bell to my paper bow and attached it with some bakers twine.


One of my favourite parts of this project is the hanging sign off the post.  I cut letters out using my Silhouette and added some holly for a splash of colour!


The top panels of the roof are embossed with a snowflake embossing folder.  Then I added some texture paste to the sides and added some glitter for some sparkle.  It really gives the feeling that the snow is dripping down from the top.  I added a battery operated tea light (that actually flickers) which really brings my lamp post to life.


I really, really enjoyed putting this project together.  I always amazes me what you can do with paper.  I hope I have inspired you to create something festive for your Christmas home decor.

So remember, in order to be entered to win the special prize all you have to do is hop from Blog to Blog and leave a comment on each as you go. Then simply check back at the Two Scrapbook Friends blog on December 10th to see if you are the lucky winner!

Here are the featured blogs in our Blog Hop:

Ann 

This is your final stop on the Songs of Christmas hop.  I really hope you enjoyed your visits to all the blogs and that we have inspired you!!

Merry Christmas!!